How to Generate Anything
GANs for People in a Hurry
“Generative adverisal networks is the most interesting idea in the last ten years in machine learning”
Yann LeCun, Facebook AI research director.
GANs are an awesome and relativity new idea in machine learning (ML). In this article, I will explain what GANs are, types of GANs and their benefits, show some companies doing amazing things with GANs and I’ll explain how to make one yourself.
What’s a GAN?
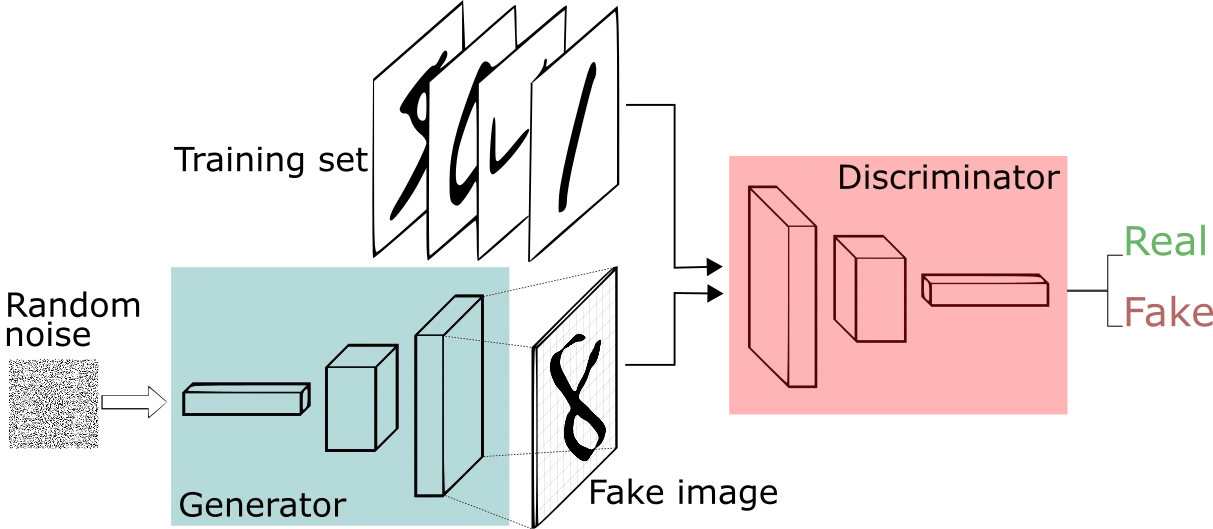
So what are these magical algorithms? GANs (Generative Adverisal Networks) are usually two CNNs(Convolutional Neural Network) and are made up of a generator and a discriminator which are adversaries. The easiest way to explain this is an analogy, so here we go! You can imagine a GAN as a police officer and a counterfeiter. The counterfeiter makes fake money, but at first, he knows nothing, so he makes something like this:

But the cop tells the counterfeiter and himself what is wrong with it, causing both the counterfeiter and police to get better. In practice, we call the counterfeiter the generator and the police the discriminator.
Types of GANs
So now that we know what GANs are, what types are there?
The Base
Any GAN needs one of these two GANs to start:
The OG GAN
This is the original GAN first referenced in a paper by Ian Goodfellow in 2014.
The DCGAN (Deep Convolution Generative Adversarial Network)
The DCGAN is an improved version of the regular GAN and is used commonly over the GAN because it’s more stable and generally better.
Extensions
After we have the base set we can improve our GAN by specializing it for a certain need. There are hundreds of ways we could change our GAN but I will just be covering the most common ones. To see more check out GAN zoo.
WGAN
The WGAN or the Wasserstein GAN is a GAN that changes the discriminator to a critic and uses the Wasserstein loss where the loss is now no longer bound between 0 and 1 and instead can be any real number. This solves the vanishing gradient problem and the mode collapse problem, which basically means the GAN will not get stuck in local minima and if generating an object with multiple groups will not get stuck generating only one group.

CGAN
The CGAN or the conditional GAN is a GAN that prevents mode collapse and allows you to sample specific images from your GAN. The CGAN does this by inputting the labels of the datasets into the GAN.

Pix2Pix GAN
The Pix2Pix GAN is your general image to image translation GAN and can do things like restoring an old image with missing parts, add colour to images with no colour, and make drawings into images. The Pix2Pix GAN works kinda like a starting point to a more complex image translation model like a cycle GAN. The Pix2Pix GAN uses a Conditional GAN to compare good outputs to worse outputs to make good outputs.

Cycle GAN
The cycle GAN allows pattern transfer without having matching datasets like if you wanted to make a horse a zebra or a photo look like a Van Gogh painting. Cycle GANs work but has two GANs. One GAN is taking in the horse (input 1) and trying to make that horse into a zebra (output 1) then a discriminator evaluating how zebra-like that horse that was made into a zebra is (loss 1). After that, the horse-zebra (input 2) is now put into another generator trying to make it look as close to the original horse (output 2) as possible. Finally, the second discriminator calculates the loss on that horse-zebra-horse (loss 2). I know that sounds extremely complex but it's basically horse to zebra back to the horse.

Progressive GAN
The progressive GAN is a GAN that grows during training, going from low resolution to high resolution. The GAN grows by adding layers to the model during training. Doing this make this GAN really stable, speeding up training and allow you to get better results.

Info GAN
The info GAN is a GAN that allows you to sort your output by proprieties like width, rotation, etc. The info GAN does this by having sorted the output by noise and latent codes.

Companies
There are not many GAN based companies, that being said, there are two main types of GAN based companies.
Content creation
Taking photo shoots and paying the salary of people to make ads are expensive. So let’s have GANs do the job for us. GANs are great at creativity work so any jobs that are design, image editing, image/video making can be automated using GANs. Some examples of companies using GANs to make creativity are RoseBud.ai, DataGrid and more. Here is a video from RoseBud showing what they do.
Product optimization
Of course, I’m talking about the holy grail of GANs, generative design. Generative design is a fantastic tech that could change the whole world. Generative design is an application of GANs that allows us to optimize building, transportation, furniture, etc through an iterative process. Some companies using generative design are Space Factory, Fusion 360 and more.

How To Make A GAN
This sounds awesome, so how do we make it. I going to show you how to make a DCGAN using Keras and TensorFlow. Links to more GANs I made at the end.
Import libraries
import tqdm
import os
import cv2
import matplotlib.pyplot as plt
import tensorflow as tf
import numpy as np
from glob import glob
import keras
This part is pretty self-explanatory, but we’re import any libraries were going to use in the code. Generally, these are the ones I would recommend but you may need to import different libraries.
Define Variables
IMG_WIDTH = 100
IMG_HEIGHT = 100random_dim = 100
np.random.seed(512)
datadir = "" #path goes here
Defining the variables for image normalization (width and height), latent space (random_dim and seed) and defining the path to the dataset.
Image Normalization/Setting up the pipeline
from tqdm import tqdm
data = []def create_data():
    path = datadir
    for img in tqdm(os.listdir(path)):
      img_array = cv2.imread(os.path.join(path,img))
      new_array = cv2.resize(img_array, (IMG_SIZE, IMG_SIZE), interpolation = cv2.INTER_NEAREST)
      drawings_data.append(new_array)
    plt.imshow(drawings_data[0])
    plt.show()
    print(new_array)create_data()
Here we are doing some basic image normalization like resizing the images and then converting them to an array so the model can use the data.
def load_data():
  x_train = data
  x_train = (np.asarray(x_train).astype(np.float32) - 127.5)/127.5
  return x_train
Here we are reshaping the array for the model.
Defining the model
def get_optimizer():
  return Adam(lr=0.0002, beta_1=0.9)
Here we are defining the learning rate and the beta for the model, generally, I recommend 0.0002 for the learning rate for most models and 0.9 beta for most models.
def get_generator(optimizer):
  generator = Sequential()generator.add(Dense(13*13*40, input_dim = random_dim,kernel_initializer=initializers.RandomNormal(stddev=0.02)))
  generator.add(BatchNormalization())
  generator.add(LeakyReLU())generator.add(Reshape((13, 13, 40)))generator.add(Conv2DTranspose(256, (3, 3), strides=(1, 1), padding='same'))
  generator.add(BatchNormalization())
  generator.add(LeakyReLU())generator.add(Conv2DTranspose(128, (3, 3), strides=(2, 2), padding='same'))
  generator.add(BatchNormalization())
  generator.add(LeakyReLU())generator.add(Conv2DTranspose(64, (3, 3), strides=(2, 2), padding='same'))
  generator.add(BatchNormalization())
  generator.add(LeakyReLU())generator.add(Conv2DTranspose(3, (3, 3), strides=(2, 2), padding='same', activation='tanh'))generator.add(Cropping2D(cropping=((2,2),(2,2))))return generator
Here we’re defining the generator model.
def get_discriminator(optimizer):discriminator = Sequential()discriminator.add(Conv2D(64, (5, 5), strides=(2, 2), padding='same', input_shape=(100,100, 3)))
  discriminator.add(LeakyReLU())
  discriminator.add(Dropout(0.02))

  discriminator.add(Conv2D(128, (5, 5), strides=(2, 2), padding='same'))
  discriminator.add(LeakyReLU())
  discriminator.add(Dropout(0.02))

  discriminator.add(Flatten())
  discriminator.add(Dense(1, activation= "sigmoid",))
  discriminator.compile(loss="BinaryCrossentropy", optimizer=optimizer)return discriminator
Here we’re defining the discriminator model.
def get_gan_network(discriminator, random_dim, generator, optimizer):
  discriminator.trainable = False
  gan_input = Input(shape=(random_dim,))
  x = generator(gan_input)
  gan_output = discriminator(x)
  gan = Model(inputs=gan_input, outputs=gan_output)
  gan.compile(loss="binary_crossentropy", optimizer=optimizer)
  return gan
Finally, here we are defining the GAN.
Training the model
def plot_generated_images(epoch, generator, examples=100, dim=(10, 10), figsize=(5, 5)):
  noise = np.random.normal(0, 1, size=[examples, random_dim])
  generated_images = generator.predict(noise)
  generated_images = generated_images.reshape(examples, 100, 100, 3)
  generated_images += 1
  generated_images /= 2plt.figure(figsize=figsize)
  for i in range(generated_images.shape[0]):
    plt.subplot(dim[0], dim[1], i+1)
    plt.imshow(generated_images[i], interpolation="nearest")
    plt.axis("off")
  plt.tight_layout()
  plt.savefig("gan_generated_image_epoch_%d.png" % epoch)
Here we are setting up a function to plot our images for us.
def train(epochs=1, batch_size=50):
  x_train = load_data()
  batch_count = x_train.shape[0] / batch_size
  adam = get_optimizer()
  generator = get_generator(adam)
  discriminator = get_discriminator(adam)
  gan = get_gan_network(discriminator, random_dim, generator, adam)
  #random noise and images
  for e in range(1, epochs+1):
    print("-"*15,"Epoch %d" % e, "-"*15)
    for _ in tqdm(range(int(batch_count))):
      noise = np.random.normal(0, 1, size=[batch_size, random_dim])
      image_batch = x_train[np.random.randint(0, x_train.shape[0], size=batch_size)]#generate fake images
      generated_images = generator.predict(noise)
      X = np.concatenate([image_batch, generated_images])#labels for fake + real
      y_dis = np.zeros(2*batch_size)
      y_dis[:batch_size] = 0.9discriminator.trainable = True
      discriminator.train_on_batch(X, y_dis)noise = np.random.normal(0, 1, size=[batch_size, random_dim])
      y_gen = np.ones(batch_size)
      discriminator.trainable = False
      gan.train_on_batch(noise, y_gen)if e == 1 or e % 5 == 0:
      plot_generated_images(e, generator)
Now we are going to define the training function and then finally we can train our model.
train(100,50)Here it is set to run for 100 epochs with a batch size of 50 but that can easily be changed.
Now you know how to make a GAN and the different types of GANs and how they are useful.
Here are some of the results I got from my GANs


Here is the Github link to see the code for all my GANs
If you like this article, you will probably like my other ones so consider following me on Medium, and well you’re doing that follow me on Twitter, Linkedin and sign up for my newsletter.